FREE UK DELIVERY ON ORDERS OVER £150 (BY ROYAL MAIL TRACKED 24)
Choose Paid Option for DPD Express
Skip to Content
Choose Paid Option for DPD Express
 KLARNA AVAILABLEOn All Products!
 5 STAR REVIEWS99% 5* Trustpilot Reviews
  EXCHANGE GUARANTEE90 day scope out guarantee
 FAST DISPATCHFast delivery on in-stock items
 MAKE AN OFFERName Your Price eBay style!

Featured
Air Rifle Confidence Bootcamp Part 12: Springer Air Rifle Spring Problems
.blog-post {
font-family: Arial, sans-serif;
color: #333;
max-width: 850px;
margin: 0 auto;
padding: 20px;
background-color: #fff;
}
.blog-post h2, .blog-post h3 {
color: #b00020;
font-weight: bold;
margin-top: 24px;
margin-bottom: 12px;
}
.blog-post h2 {
font-size: 1.5rem;
}
.blog-post h3 {
font-size: 1.25rem;
}
.blog-post p {
font-size: 1rem;
line-height: 1.6;
margin-bottom: 16px;
}
.blog-post ul {
padding-left: 20px;
margin-bottom: 16px;
}
.blog-post li {
margin-bottom: 8px;
}
Troubleshooting Springer Air Rifle Spring Problems
If you're using a spring-powered air rifle (commonly called a “springer”), understanding and identifying spring-related issues is crucial for long-term accuracy and performance.
While springers are known for their simplicity and reliability, the mainspring inside does a lot of work—and when things go wrong, it usually shows up in your accuracy or shot feel. ...this has caused a few "scope is faulty" returns when it was the rifle.
In this post, we’ll help you recognise the most common spring problems and explain how to fix or avoid them.
1. Weak or Broken Spring
Symptoms:
Noticeable drop in pellet velocity
Shots falling short at distances the rifle previously handled easily
More mechanical “twang” or vibration
What’s happening: The mainspring may have weakened with use or snapped entirely. This reduces energy transfer and leads to inconsistent power.
Fix: A spring replacement is often needed. While some experienced shooters handle this themselves, beginners are better off going to a qualified airgun technician or gunsmith. Use a high-quality replacement spring designed for your model for best results.
2. Twangy Recoil and Vibration
Symptoms:
Sharp, buzzy recoil when firing
Unpleasant vibration felt through the stock
Increased noise with each shot
Cause: The spring is vibrating side-to-side inside the piston chamber. This is common with loose-fitting or dry springs.
Fix: Apply proper spring grease or tar-like damping compound to reduce vibration. You can also add a spring guide or top hat to keep the spring aligned inside the tube. These small upgrades make a huge difference to the shot cycle and noise level.
3. Spring Set or Loss of Preload
Symptoms:
Gradual drop in power over time
Rifle feels easier to cock than before
Less snappy recoil
Cause: The spring has "set", meaning it's permanently compressed and has lost some of its stored energy. This happens naturally over many cycles or if the rifle is stored cocked for long periods.
Fix: You may need to replace the spring or install preload spacers if performance is declining. Some rifles benefit from a tuning kit that restores or even improves original power.
4. Noisy or Inconsistent Action
Sometimes the rifle just doesn't sound or feel right when you shoot it. This can be caused by worn spring ends rubbing against the piston, or dry contact points in the powerplant.
Fix: A full internal inspection may be necessary. Applying a thin layer of moly grease to the spring and guides often quiets the action and restores consistency.
Best Practices to Prevent Spring Issues
Never store your rifle cocked—it puts strain on the spring
Keep internals dry and lubricated with airgun-safe products
Use quality pellets to avoid excessive internal wear
If your rifle feels off, stop shooting and inspect before damage worsens
With proper care and attention, your springer rifle can deliver years of reliable service. And if problems do arise, you’ll now have a better idea of what’s going on and how to fix it.
Course Menu - Air Rifle Confidence BootcampPrevious - Part 11 - Troubleshooting Common Air Rifle Issues for BeginnersNext - Part 12 -
READ ARTICLE

Featured
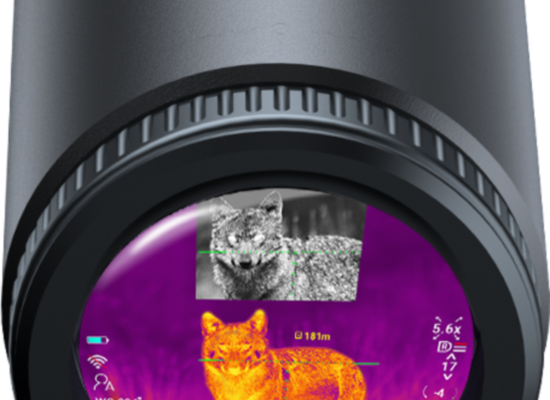
Transforming Night Hunting with the HIKMICRO Alpex 4K Lite
A Lighter, Smarter Scope for Airgun Hunters
The evolution of night vision optics has brought us a new standout contender: the HIKMICRO Alpex 4K Lite. Designed specifically with airgun and rimfire shooters in mind, this streamlined scope delivers power, performance, and precision, all wrapped up in a compact, affordable package.
Unlike bulkier digital scopes, the Alpex 4K Lite was developed with direct input from airgun hunters. The result is a device that strips away unnecessary extras while keeping the key features that matter most in the field.
Built for Airgun Pest Control
In the Field Sports Britain video, shooting legend Terry Doe takes the Alpex 4K Lite into the field for some real-world rabbit control. The scope’s day/night mode, IR illumination, and laser rangefinder come into their own as daylight fades.
Even as dusk sets in, the Lite delivers a clear, bright image; allowing accurate target ID and confident shot placement at ranges well beyond 50 yards. With a slim profile and intuitive controls, the scope is easy to handle on the move, especially when stalking skittish rabbits.
Why Airgunners Are Switching to the Lite
The Alpex 4K Lite isn’t just about cutting weight, it’s about making serious tech usable for smaller setups. Here’s what makes it ideal for airgun pest control:
Compact and Lightweight: Weighs just 474g without battery, perfect for rimfires and sub-12ft-lb air rifles.
4K Ultra HD Sensor: Delivers razor-sharp detail, day or night.
Ballistic Calculator: Inputs your data for accurate holdover at various distances.
Laser Rangefinder (LRF): Built-in ranging up to 1000m.
Day/Night Versatility: Seamless switching between modes for 24-hour capability.
Terry Doe’s Verdict: "I’m Buying One"
Terry’s seal of approval is more than just lip service, as he ends the video stating clearly that he’ll be buying one himself. From a man who’s tested more optics than most of us have had hot dinners, that’s a strong endorsement.
For pest controllers, especially those targeting rabbits around stables or farmland, the Alpex 4K Lite offers enough range, clarity, and battery life to get the job done efficiently and humanely.
Final Thoughts
The Alpex 4K Lite isn’t a watered-down version of a better scope, it’s a purpose-built tool that finally brings high-end features to airgun hunters without the bulk or price tag of a full-sized digital optic.
If you’re looking for an ultra-capable night vision scope that feels right at home on a lighter rifle, this might just be the one.
Shop the HIKMICRO Alpex 4K Lite now or watch the full Field Sports Britain video to see it in action. We've embedded it below:
READ ARTICLE

Featured
Air Rifle Confidence Bootcamp Part 6: Shooting Technique Accuracy Fundamentals
.blog-post-technique {
font-family: system-ui, sans-serif;
color: #222;
max-width: 800px;
margin: 0 auto;
padding: 1rem;
background-color: #fff;
}
.blog-post-technique h2,
.blog-post-technique h3 {
color: #b00020;
font-weight: 700;
margin-top: 1.5rem;
margin-bottom: 0.5rem;
}
.blog-post-technique h2 {
font-size: 1.75rem;
}
.blog-post-technique h3 {
font-size: 1.3rem;
}
.blog-post-technique p {
font-size: 1rem;
line-height: 1.6;
margin-bottom: 1rem;
}
.blog-post-technique ul {
padding-left: 1.2rem;
margin-bottom: 1rem;
}
.blog-post-technique li {
margin-bottom: 0.5rem;
}
.blog-post-technique blockquote {
border-left: 4px solid #b00020;
margin: 1rem 0;
padding: 0.5rem 1rem;
background: #fff0f0;
color: #444;
}
Shooting Technique & Accuracy Fundamentals for New Air Rifle Shooters
So you've chosen your air rifle, sorted your pellets, and found a legal place to shoot. Now it's time to hit what you’re aiming at — consistently.
Good shooting isn’t about luck or scopes and sights (to be covered in depth in other artcleses). It’s about repeatable technique. This post covers the fundamentals that new shooters need to master accuracy from day one.
1. Shooting Position & Stability
Whether you’re shooting standing, prone, or from a bench, your goal is stability. If you wobble, so will your shot.
Prone: offers the most stability and is great for target practice.
Seated at a bench: ideal for zeroing and casual shooting.
Standing: the least stable but good for field practice or hunting.
Tip: Use a bipod, sandbag, or rest to reduce movement.
2. Correct Rifle Hold
Don’t grip your air rifle like a shotgun or hunting rifle. Air rifles are sensitive to hold, especially springers.
Keep your leading hand relaxed, supporting the fore-end (not gripping hard).
Rest the butt of the rifle snugly into your shoulder.
Maintain a gentle but secure grip with your trigger hand.
This is often called the “artillery hold” — let the rifle recoil naturally.
3. Breathing Control
Breathing affects aim more than you think.
Take a deep breath.
Let it out slowly.
Pause halfway through your exhale and hold briefly — that’s your shot window.
Don’t hold your breath too long or rush the shot.
4. Trigger Technique
Yanking the trigger ruins accuracy.
Place the pad of your index finger on the trigger — not the joint.
Apply gentle, straight-back pressure.
Don’t “jerk” or anticipate the shot — it should come as a surprise.
Practice this dry (unloaded) before live firing.
5. Follow-Through
The shot doesn’t end when the pellet leaves the barrel.
Keep your eye on the target.
Maintain your position.
Resist the urge to drop the rifle or look up.
Follow-through is crucial for diagnosing shots and building muscle memory.
6. Practice with Purpose
Random plinking can be fun, but deliberate practice improves accuracy.
Use targets with defined bullseyes and scoring zones.
Track your groups and aim for consistency before chasing perfection.
Focus on one skill at a time — hold, breathing, trigger, or follow-through.
Download free targets here
Final Thoughts
Accuracy isn’t about the latest gear or luck — it’s about technique. Nail these fundamentals and your air rifle will reward you with tight, repeatable groups.
Remember: slow is smooth, smooth is accurate.
Course Menu - Air Rifle Confidence BootcampPrevious - Essential accessories and set up for beginnersNext - Scopes & Sighting Systems Explained for Air Rifle Beginners
READ ARTICLE

Featured
Air Rifle Confidence bootcamp Part 7: Scopes & Sighting Systems Explained for Air Rifle Beginners
.blog-post {
font-family: Arial, sans-serif;
color: #333;
max-width: 800px;
margin: 0 auto;
padding: 20px;
background-color: #fff;
}
.blog-post h2, .blog-post h3 {
color: #b00020;
font-weight: bold;
margin-top: 20px;
margin-bottom: 10px;
}
.blog-post h2 {
font-size: 1.5rem;
}
.blog-post h3 {
font-size: 1.25rem;
}
.blog-post p {
font-size: 1rem;
line-height: 1.6;
margin-bottom: 15px;
}
.blog-post ul {
padding-left: 20px;
margin-bottom: 15px;
}
.blog-post li {
margin-bottom: 10px;
}
Scopes & Sighting Systems Explained for Air Rifle Beginners
Choosing your first scope—or deciding if you even need one—can be a bit overwhelming for new air rifle users. There are dozens of options out there, each with technical specs that sound more complicated than they really are. This guide strips away the confusion and helps you understand the main types of sighting systems available, when to use them, and how to choose the right one for your shooting goals.
Do You Even Need a Scope?
It depends on what you're doing. For casual backyard plinking at close range, open sights or red dots may be all you need. But if you plan to shoot at longer distances or require precision (such as pest control or target shooting), a scope becomes an essential tool.
Scopes magnify your target, provide a clearer point of aim, and often include features that help compensate for distance and wind. For most airgun users in the UK, a good scope will dramatically improve accuracy and consistency.
Types of Sighting Systems
1. Open Sights (Iron Sights)
These are the simplest type of sight—usually a notch-and-post setup. They're found on many beginner rifles and are great for short-range shooting and learning basic aiming techniques.
Pros: Lightweight, no batteries needed, very durable. Cons: Limited accuracy, difficult to use in low light or for precision shooting.
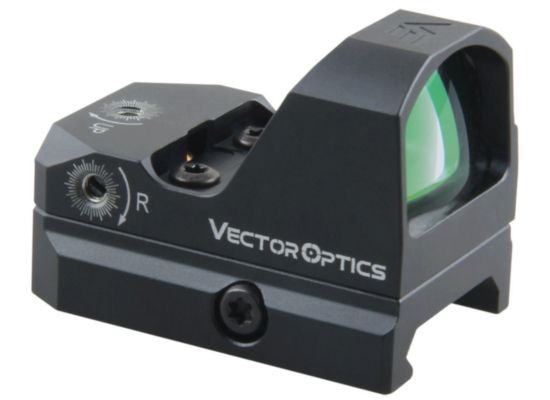
2. Red Dot Sights
Red dot or reflex sights project a small illuminated dot as your aiming point. They're fast and intuitive—ideal for reactive shooting up close.
Pros: Fast target acquisition, works with both eyes open. Cons: Not magnified, not ideal for long-range precision.
See our red dots here. Most red dots come with weaver/picatinny bases for which you will need an adapter to fit to an air rifle 11mm dovetail. Snap ins adapters are ideal. Vector or UTG snaps ins are perfect.
3. Telescopic Scopes (Optical Scopes)
So many to choose from! You can see what we have here in the Day Scopes - Traditional section. There you can use filters to narror your options on things like brand, price, tube size, objective lens size, maximum magnification, parralax and more. Good brands to start with are WULF, Hawke, Vector, PAO
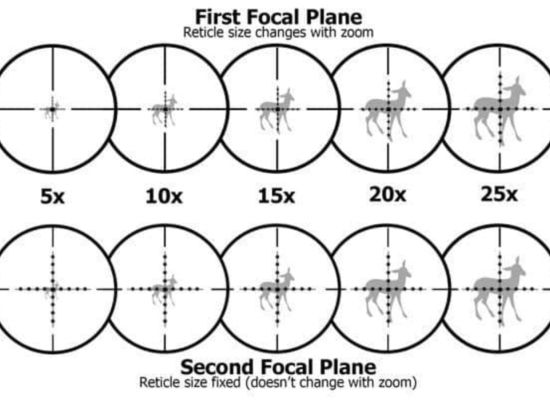
These are the most common type used by air rifle shooters. They magnify the target and typically feature crosshairs or other reticles to help with precision aiming. Magnification ranges from fixed (e.g. 4x32) to variable (e.g. 3–9x40).
Pros: Better long-range accuracy, clearer view of the target. Cons: Can be heavier, takes time to learn how to use properly.
Key Features Explained
Magnification: Determines how close the target appears. For sub-12 ft-lb air rifles, a 3–9x magnification is usually more than enough.
Objective Lens (e.g. 40mm in 3–9x40): Affects how much light enters the scope. Larger lenses are brighter but heavier.
Parallax Adjustment: Helps maintain focus at shorter distances—especially useful for air rifles shooting at 10–30 metres.
Reticle Types: From simple crosshairs to mil-dot, reticles help you adjust for range, wind, or holdover.
Tube Size: 1-inch and 30mm are the most common. Larger tubes allow more adjustment range and light transmission.
Choosing the Right Scope for Your Needs
Match your scope to your shooting style:
Backyard target shooter: A 4x32 fixed scope or red dot is affordable and effective.
Hunting or pest control: Go for a variable scope (e.g. 3–9x40 AO) with parallax adjustment for flexible performance.
Benchrest/precision shooting: Consider higher magnification and a more advanced reticle for accurate range holdovers.
Mounts Matter Too
Even the best scope won’t help if it’s not mounted correctly. Make sure to use mounts that fit your rail type (11mm dovetail or 20mm Picatinny/Weaver) and are the correct height for your scope’s objective lens and tube diameter. Always tighten evenly and consider using a scope stop or one-piece mount to prevent movement on spring-powered rifles.
Tacticalscopes mount rings are here. Great brands for air rifles are BKL, Hawke, Sportsmatch and Hawke. One or 2 piece, don't worry about things like extdned, cantilever etc for now.
Final Thoughts
Don’t stress over having the fanciest scope. Start with something simple and upgrade as your needs evolve. A decent entry-level scope, properly mounted and zeroed, will transform your accuracy and boost confidence faster than you think.
Course Menu - Air Rifle Confidence BootcampPrevious - Part 6 - Shooting Technique & Accuracy FundamentalsNext - Part 8 - How to Zero Your Air Rifle Scope
READ ARTICLE

Featured
Air Rifle Confidence bootcamp Part 8: How to Zero Your Air Rifle Scope (Without Going Round in Circles)
.blog-post {
font-family: Arial, sans-serif;
color: #333;
max-width: 850px;
margin: 0 auto;
padding: 20px;
background-color: #fff;
}
.blog-post h2, .blog-post h3 {
color: #b00020;
font-weight: bold;
margin-top: 24px;
margin-bottom: 12px;
}
.blog-post h2 {
font-size: 1.5rem;
}
.blog-post h3 {
font-size: 1.25rem;
}
.blog-post p {
font-size: 1rem;
line-height: 1.6;
margin-bottom: 16px;
}
.blog-post ul {
padding-left: 20px;
margin-bottom: 16px;
}
.blog-post li {
margin-bottom: 8px;
}
How to Zero Your Air Rifle Scope (Without Going Round in Circles)
You've got your air rifle, mounted your scope, and are ready to shoot. But unless it's properly zeroed, your shots won't consistently hit where you're aiming—no matter how good your aim is. Zeroing your air rifle scope is a vital skill every shooter must master. It aligns your point of aim with your point of impact at a specific distance.
This post breaks the zeroing process down step-by-step, helps you avoid common pitfalls, and gives you confidence to get it right the first time—without wasting pellets or patience.
Not got a scope yet? Choose or upgrade your air rifle scope in our day scopes section HERE. When there you can play with filters to choose by many factors. If budget is low to medium start with Brands: WULF, Hawke, Vector. If you have a big budget keep those brands but change the price minimum and maxium and add brands Arken, Delta, Element. MTC, Vortex
What Does "Zeroing" Actually Mean?
Zeroing means adjusting your scope so that the crosshairs align with where your pellet is actually striking at a chosen distance. For sub-12 ft-lb air rifles, this is typically 20 to 30 yards depending on what you're shooting and your pellet's trajectory.
Once zeroed, your aim point at that distance becomes precise. With a bit of understanding of pellet drop, you can then use the same crosshair or reticle markings to estimate impacts at other ranges too.
What You’ll Need
Air rifle and scope (mounted correctly with level mounts)
Pellets (use the same type and batch you intend to shoot with) See how to choose pellets here
A solid shooting rest or bench (minimises wobble and human error)
Paper targets with a visible bullseye. Not got any, get some free air rifle targets here
Allen keys/screwdriver for turret adjustments
Distance measuring tool (laser rangefinder or tape measure)
Calm conditions (avoid strong wind)
Step-by-Step: How to Zero Your Air Rifle Scope
1. Set Up at a Known Distance
Start at 10 or 15 yards if you're indoors or unsure where the scope is currently pointing. Otherwise, 20 to 25 yards is a good default range. Set up your paper target on a safe, flat backstop.
2. Stabilise Your Rifle
Use a bench, bipod, sandbag, or cushion—anything to keep your rifle steady. The goal is to remove as much shooter movement as possible so you can assess the true impact of each shot.
3. Fire a 3-Shot Group
Aim at the exact centre of your target and shoot three times, aiming at the same point each time. Don’t adjust between shots yet. This group will show you where the rifle is hitting in relation to the crosshairs.
4. Assess the Group
Ignore outliers from flinching or heavy breathing. Look at where the main group is forming in relation to your aim point. Measure the vertical and horizontal distance from the centre of your group to the centre of the bullseye.
5. Adjust Your Turrets
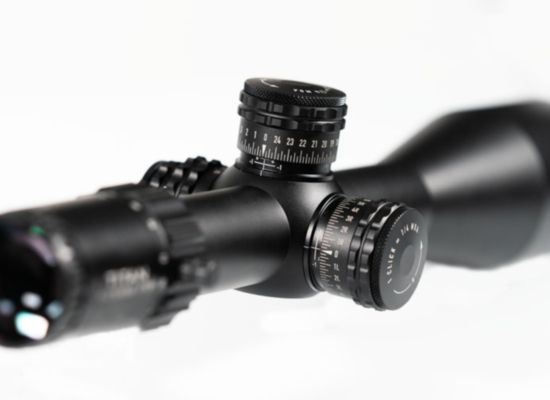
Your scope has two turrets:
Elevation (Up/Down): Usually the top turret.
Windage (Left/Right): Usually on the right side.
Each 'click' on a turret usually moves your point of impact by 1/4 MOA (Minute of Angle), which is around 1/4 inch at 100 yards—or about 1/16 inch at 25 yards.
If your group is hitting low and left, dial UP and RIGHT. Go slowly—better to make several smaller adjustments than one big one.
6. Fire Another 3-Shot Group
After adjusting, shoot another group at the same aim point. You should see the impact move closer to the centre. If it’s still off, make small corrections and shoot again. Repeat until your group consistently lands on the bullseye.
Tips to Get a Faster, Cleaner Zero
Use the same pellets you plan to shoot long-term—zeroing with one type and switching later will throw things off.
Don’t chase every shot—use consistent 3- or 5-shot groups to assess, not individual impacts.
Take your time between shots to stay consistent and avoid heat or fatigue affecting the results.
Don't zero in strong wind—gusts can push lightweight pellets off target.
Lock your turrets if your scope has caps or locks to prevent drift over time.
Should You Zero at 25 or 30 Yards?
This depends on your typical shooting distance. For general garden plinking or short-range pest control, 20–25 yards is ideal. If you're pushing 30–35 yards regularly, consider zeroing slightly further, but always stay consistent and learn your pellet's trajectory to adjust at other ranges.
Advanced: Learn Your Holdovers
Once you’ve zeroed at one range, your pellet will shoot above or below the crosshairs at different distances. You can use holdover (aiming higher or lower using reticle marks) to compensate. Spend time learning where your pellets hit at 10, 15, 30, and 35 yards. Keep a chart or notes if needed!
Final Word
Zeroing doesn’t have to be confusing. Follow this process slowly and methodically, and you’ll dial in your air rifle so that it hits exactly where you're aiming. Confidence starts here—and with a reliable zero, your accuracy and enjoyment will improve dramatically.
Next up in Part 9, we’ll focus on safe shooting practices and how to set up a range that’s effective, safe, and fun to use.
Course Menu - Air Rifle Confidence BootcampPrevious - Part 7 - Scopes & Sighting Systems Explained for Air Rifle BeginnersNext - Part 9 - Safe Shooting Practices & Range Setup
READ ARTICLE